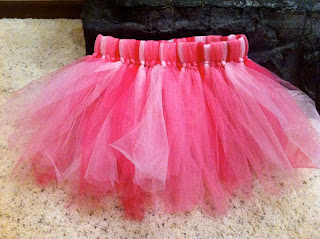
DIY Valentine's Day Projects: Tulle Skirt
DIY Valentine's Day Projects: Tulle Skirt
Welcome! Make sure to subscribe to our daily email newsletter
to learn how to save the most money on all your
Retail purchases and find all the great deals!
Do-It-Yourself is a great option for saving money on apparel, gifts, decorating and remodeling. Today's DIY Project is a handmade Tutu.
I've been wanting a fun flirty Tutu for our daughter, but didn't want to pay $20+ for it. I did some research and realized I could make one myself. With coupons and sales, this project only cost me $7. The spools of tulle were 50% off and I used a coupon on the elastic. The rest of the supplies, I already had on hand.
For this project you'll need:
- 50 yards of tulle (each spool is typically 25 yards)
- Non-roll Elastic (it must be the non-roll kind)
- Scissors
- Sewing Machine (or you could hand stitch)
- Thread/Needles/Pins
- Measuring tape or yard stick
Measure your child's waist and then subtract 2-3 inches. Use that measurement to cut your non-roll elastic. As I mentioned in the supply list, it does need to be the non-roll kind. I got mine at Hobby Lobby in the Notions section.
Either using a sewing machine (or sewing it by hand), sew the two ends together. Make sure to backstitch so the seem is secure.
Now you'll need to determine how long you'll want the Tutu. Measure from your child's waist to the desired length. Double that number and then add about 1-2 inches. (You'll need that extra amount to accommodate the knots.) I used a complete length of 26-28 inches. The 50 yards of tulle was sufficient for that length. Using the two entire spools, measure your tulle using a yard stick. Then cut the tulle. (Tip* - Don't stretch the tulle when measuring. It will make your cuts uneven. Lay it flat when cutting.)
Next comes the fun part, tying the tulle on the elastic. I slipped the sewn elastic loop through my leg to make it easier to work with. Take a strip of tulle and fold it in half. Lay it under the Elastic.
Take the ends of the tulle and put it through the loop you've made at the top.
Then pull it down. Make sure it's snug against the Elastic.
Next, tie a knot at the base of the Elastic with the remaining tulle.
Continue the Tying Steps, alternating colors (if you choose), with all of the tulle strips. Make sure they are snug up against the previous strip.
After I sewed the Elastic and cut the strips, I think it only took me about 1/2 an hour to tie all the strips of tulle. So easy! And you should have seen the look on our daughter's face when I gave it to her. Priceless!!!
Watch for more money saving DIY tips for Decorating and Remodeling! What creative ways have you used to save money on decorating? I found some incredible inspiration on Pinterest (you can follow me there, too).
Don’t want to miss a single deal? Go here to get Hot Deals sent directly to your Inbox! Thanks for joining Your Retail Helper.


0 comments:
Post a Comment